Metabase - BI on ERPnext

Install Metabase and connect to ERPNext to analyze data
Hey there! In one of my last blog posts, here, I set up an Open Source ERP system called ERPNext that keeps track of all important business processes. To analyze all this data a dedicated Business Intelligence [BI] system is the best choice. There are many BI systems out there. Popular ones include Tableau, PowerBI or SAP Analytics Cloud for the SAP users out there. These tools typically cost money so a popular choice among cash strapped startups is Metabase. It is an easy to use dashboarding tool that can be hosted anywhere, connects to the most common databases and has a free license available that comes with the most important features to get started. You can also choose to pay for a hosted version or for additional features like single sign on. Below I explore how to install it on a Linux VM and connect it to ERPNext.
Prerequisites
You will need a VM running Ubuntu >=18.04 with at least 1GB and 1 vCPU (Source). I would recommend to start with twice the size and if you expect a lot of concurrent access scale it accordingly. You can always adjust the allocated RAM in your hypervisor later. Also Metabase is designed to scale horizontally across many application servers. In your VM you will also need:
- a priviledged user
- internet access
Installation
The installation follows the official Metabase documentation for a productive setup: Link. I will run Metabase in docker using docker compose. Metabase needs a database to store internal information like dashboards, users etc. I will use Postgres as its database and run it on the same host. Note that you might want to run postgres on a different host for increased resilience. Depending on how critical the availability of Metabase is to you, you might also want to run Metabase and its underlying database in a high availability setup. This would require you to set up a proxy and one or two additional hosts as well as a sync for the internal database. The following is a minimal installation without high availability.
Installing docker engine and docker compose
I assume you start with a clean VM.
- Uninstall docker on your VM
 sudo apt-get purge docker-ce docker-ce-cli containerd.io docker-compose-plugin
 sudo rm -rf /var/lib/docker && sudo rm -rf /var/lib/containerd
Install docker by adding it to the list of repositories, following the official guide which can be found here:
- Update and install dependencies
sudo apt-get update sudo apt-get install \ ca-certificates \ curl \ gnupg \ lsb-release- Download the GPG key to verify validity of the install packages
sudo mkdir -p /etc/apt/keyrings curl -fsSL https://download.docker.com/linux/ubuntu/gpg | sudo gpg --dearmor -o /etc/apt/keyrings/docker.gpg- Add the repository
echo \ "deb [arch=$(dpkg --print-architecture) signed-by=/etc/apt/keyrings/docker.gpg] https://download.docker.com/linux/ubuntu \ $(lsb_release -cs) stable" | sudo tee /etc/apt/sources.list.d/docker.list > /dev/null- Install docker
sudo apt-get update sudo apt-get install docker-ce docker-ce-cli containerd.io docker-compose-plugin- Verify that docker is running
sudo docker run hello-world
In your terminal docker should confirm the successful information.
- Create a docker-compose file e.g. in your home directory
vi /home/docker-compose.yml
Add the following to the docker-compose file:
services:

  postgres-db:
    image: postgres:15
    restart: always
    # ports:
    #   - 5432:5432
    env_file: .db.env
    volumes:
      # declare your mount volume /host/dir:/container/dir
      - /home/app/metadata:/var/lib/postgresql/data
    networks:
      - metabase-network

  metabase-app:
    image: metabase/metabase
    restart: always
    ports:
      - 3000:3000
    env_file: .metabase.env
    depends_on:
      - postgres-db
    networks:
      - metabase-network

networks:
  metabase-network:
    driver: bridge
This file defines two services, the postgres database as the internal database of Metabase, where all the Metadata about the dashboards, users etc. is stored and the Metabase app. The file also defines the network that the docker containers use to communicate with each other. It is important to define a persistent volume for the postgres, this is where the internal data of Metabase will be stored on your host. you can backup or sync this directory e.g. via rsync. This is done under volumes:
- create the .env files that configure Metabase and the Postgres database to work together.
touch /home/.db.env
touch /home/.metabase.env
in .db.env add:
POSTGRES_USER=<e.g. metabase>
POSTGRES_PASSWORD=<somePassword>
PGDATA = /var/lib/postgresql/data
POSTGRES_DB=<e.g. metabasedbapp>
In .metbase.env add:
# Metabase
MB_DB_USER=<your Postgres DB user specified above>
MB_DB_PASS=<your Postgres DB password specified above>
MB_DB_TYPE=postgres
MB_DB_DBNAME=<same db name as above e.g. metabasedbapp>
MB_DB_PORT=5432
MB_DB_HOST=postgres-db
make sure to replace everything in <…>.
- Create a shell script that loads your compose file on start of the VM. .
sudo vi /home/admin_metabase/Rezemo/Metabase/startup_mb.sh
sudo chmod +x /home/admin_metabase/Rezemo/Metabase/startup_mb.sh
Add to the startup_mb.sh file: #!/bin/bash cd /home/startup_mb.sh docker compose up -d
Instead of cd to the directory you could also specify the file in the docker compose command
- Configure autostart of docker-compose on VM start:
sudo crontab -eIn crontab add: @reboot /home/admin/metabase/Rezemo/Metabase/startup_mb.sh
- Reboot your VM with
sudo reboot
With this you should have a running Metabase on <ip-of-your-VM>:3000. Metabase will lead you through the configuration.
Create a user for Metabase and allow connection to the ERPNext database
In order to analyze data we need access to the ERPNext database.
- Log into your ERPNext database e.g. when you are running mariadb (mysql is very similar):
sudo mysql -uroot -p - enter your password and create a new user.
CREATE USER <username>@<hostnameOrIP/netmask> IDENTIFIED BY 'password';
hostnameOrIP/netmask: is the hostname or IP of your Metabase VM. With Netmask you can also specify a subnet e.g. 192.168.1.0/255.255.255.0 to allow the user to connect from the entire subnet of 192.168.1.*
- Find your ERPNext database, the name should be a cryptic sequence of letters and numbers such as _4lo8f489pl3218
SHOW DATABASES; - Grant Read Rights to the Metabase user:
GRANT SELECT ON <yourdbname>.* TO 'metabase'@'192.168.1.0/255.255.255.0' identified by 'password';
`FLUSH PRIVLEGES`;
where
is the db name from the step above. - Edit /etc/mysql/mariadb.conf.d/50-server.cnf and change bind-address = 0.0.0.0
vi /etc/mysql/mariadb.conf.d/50-server.cnf - Reboot the ERPNext VM with
sudo reboot
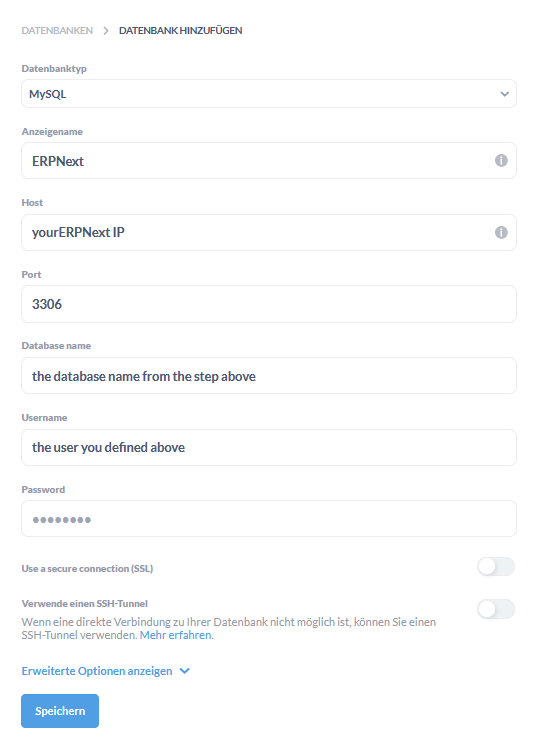
Connect to ERPNext in Metabase:
After logging in with your Admin user head to the administration configuration and databases and add a new database:
Final thoughts
Since I run the BI tool directly against the productive database I always have real time data which is great. On the other hand complex analytical queries will likely take long and impair the performance of transactional processes. Therefore it makes sense to set a high caching time for long running queries in the Metabase settings and also set a fixed time for schema scans in the database e.g. during the night. When your analytical loads continue to grow, you should certainly think about offloading the analytical workload to a dedicated datawarehouse, i.e. a database optimized for typical analytical workloads like multidimensional data analyses.
